The CarHub Guide to Changing a Car Tire
Posted on April 8, 2021
How To Change a Tire?
Cars are pretty efficient these days. The truth is, most of them work so well that most people go their entire lives driving them without ever learning the essential skills necessary to fix them when they need to be fixed.
You may think, ‘but I have a cell phone! I’ll just call CAA.’ Well, fair enough, but what if the cell phone that you rely on doesn’t work? You could be out of range, or out of battery. That’s why learning how to change your car tire will be the failsafe that ensures that you can get back on the road if an accident does occur.
No car is perfect though. Even the best of them suffer mishaps and finding yourself in a tight spot without the skills to get yourself out of it is a preventable circumstance. Mishaps include blow tires, of course, and knowing how to swap out a car tire could save you a few headaches down the road.
With regular car maintenance from a CarHub licensed technician, car tire blowouts should be few and far between. They can still happen though. Don’t worry, in our long line of car maintenance tips, we’ve decided to include a guide to changing tires, just for your benefit.
When To Change Tires?
Ideally, swapping out tires will be a choice that you’ve made rather than a necessity. You should change your car tire if you notice that they’ve become worn and threadbare or otherwise pocked or damaged. While changing out tires you should be aware of the style and type of your tires so that your replacements are a proper fit for your vehicle. Pay close attention to the symbols on your tire wall, they’ll tell you everything that you need to know!
Of course, the most obvious way to know if you should change a tire is if you’ve got a flat! When the time comes, knowing what to do to make to get back out on the road will be a gamechanger.
How Long Does It Take to Change a Tire?
Practice makes perfect! You should take the time to do a few tire changes in your driveway before you find yourself in a real-life situation where you need to figure it out on the fly. Even for an amateur, the process should be pretty quick though. If it all goes according to plan, a tire change should take anywhere between fifteen and thirty minutes.
Nascar pit stop crews can swap out a car in four seconds, so that’s your standard to beat!
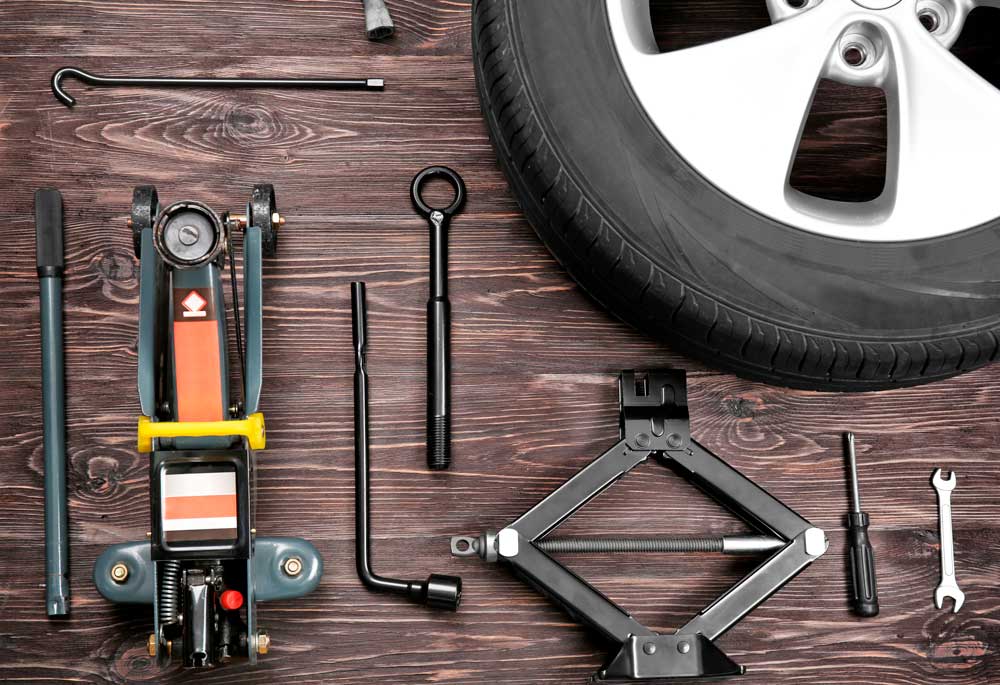
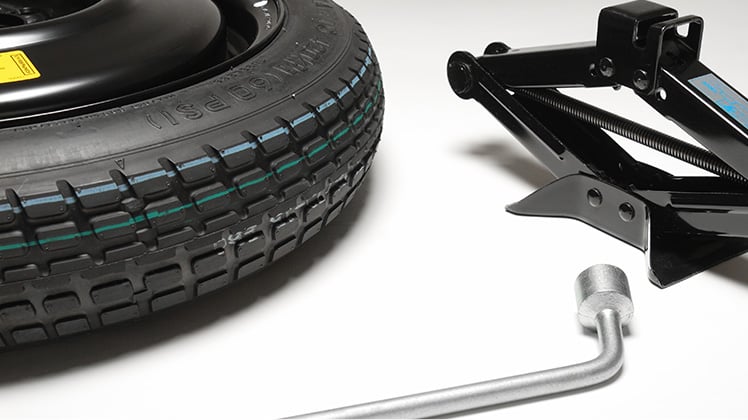
What You’ll Need
There are a few essential tire changing tools that you’ll need to change your tires properly. Changing a tire isn’t a technically difficult job, however, so don’t worry, the tools required are the types that most people keep handy in a vehicle already. The bare essentials that you’ll need are a tire jack, a lug wrench, a fully inflated spare tire and your vehicle’s owner's manual.
Take a quick inventory of your vehicle. If you don’t have one of these items present, you should replace it straight away. Knowing that you have them in your vehicle should provide peace of mind that you won’t find yourself on a desolate stretch of highway wishing that you had taken the time to make sure that you had your tire changing kit stocked and ready to go in the event of an emergency.
Your Spare Tire
It’s important to make sure that your spare tire is ready to go when it’s called upon. That means that you should keep them filled to the recommended PSI at all times, even when they’re not in use. When you fill your other tires, don’t forget to give your spare the attention that it deserves as well.
The ‘Nice to Have’ Items
While these items aren’t essential, they could be the difference-makers that allow your tire change to be a more pleasant and safer experience. It’s easy to keep a rain poncho, a pair of work gloves, wheel wedges, a working flashlight, and a small cut of wood to secure your jack in the trunk of your car. When the time comes to change your tire, these simple items will be a big help in getting the job done right.
Step 1: Safety First
When a flat hits, the first thing that you should do is think about safety. An abrupt stop or turn could spell disaster so avoid those two actions. Instead, slow your speed and look for a flat, level patch of road with a wide shoulder that you can guide your car to. The flatter the better: it will prevent your car from rolling. Make sure that the spot that you choose is visible. Choosing to change your car tire at the culmination of a curve could result in worse trouble for you if oncoming traffic is blind to your chosen service spot.
Making sure that you find a safe spot for your car tire change should be your primary concern in this situation. Driving on a flat will damage your rim but that is better than the potential outcome of parking dangerously.
Step 2: Get the Hazards On
As soon as you realize that something is wrong you should turn your hazard lights on. You’ll need to reduce your speed immediately. Turning your hazard lights on will alert other drivers about your predicament so that they can give you space and stop to help if you need it.
Step 3: Wedge Your Wheels and Set Your Parking Brake
When you stop make sure you apply your parking brake. Every precaution that keeps your vehicle from rolling away is worth taking!
Speaking of keeping your vehicle from rolling, wheel wedges placed in front or behind your tires will ensure that your vehicle stays in place while you get your work done.
Step 4: Uncap Your Tire’s Full Potential
Some vehicles don’t have hubcaps installed - in that case, you got lucky and skipped a step. If your vehicle does, it’s easiest to remove the hubcap while the tire is still on the ground rather than when it is lifted on the jack.
For most cars, the flat end of your lug wrench will work to remove your hubcap. If it doesn’t work, you may require a specialized tool to accomplish this job. Your owner’s manual should be able to provide you with all of the information that you need for properly removing the hubcaps that your vehicle is equipped with.

Step 5: Loosen the Lugs
This is where your lug wrench comes into play. Use it to turn the lug nuts counterclockwise until you feel them loosen. They’re likely to be on there tight so be prepared to put your weight into it to get the job done. Just loosen them to a quarter or half turn at this stage though. You’ll release them the full amount when it’s time for you to remove your tire from the vehicle.
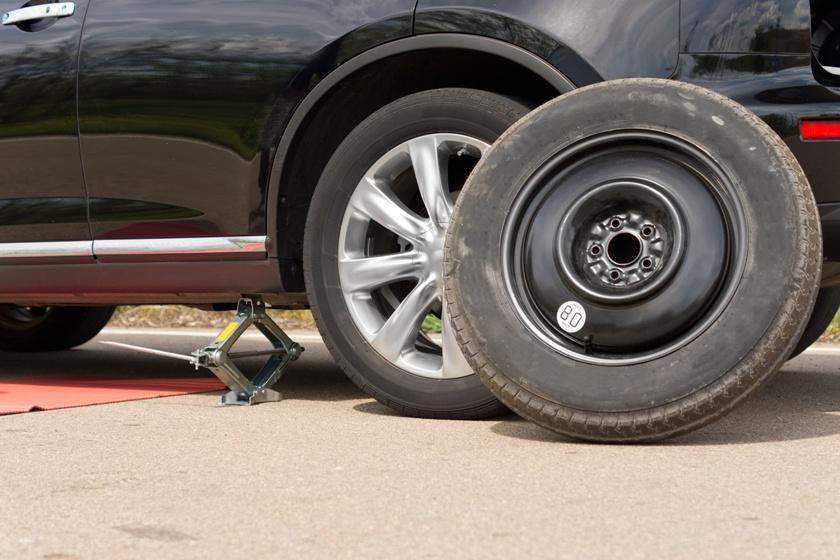
Step 6: Jack It Up
The next step in the process is to get your car boosted up on its jack. The correct placement of the jack is beneath your car’s frame, alongside the flat tire. Some vehicles have a specific spot for the jack. Make sure that you check for this, it will make the process easier and safer. The spot will look like an area of exposed metal. To be sure of where and how to best jack up your vehicle, consult your owner’s manual.
Set the jack on the cut of wood in your kit. This will ensure that your jack doesn’t slip or become unbalanced when you jack up your vehicle.
When you have the jack in its proper place, raise the vehicle about six inches off of the ground. Make sure that you never place any part of your body under the vehicle while it’s raised. If the jack slips that’s the last place that you want to be!
Step 7: Remove the Flat
Now the time has come to fully loosen the lug nuts that you got started on earlier in the process. Since they’ve already been started, you should be able to unscrew them the rest of the way by hand. When the lug nuts are free from the tire, you should be able to pull the tire off of the hub completely and set it aside.

Step 8: Get the Spare in Place
Push the spare tire onto the hub by lining up the rim with the lug bolts. When the rim is properly aligned, it should slide into place on the hub. When it is in place, put the lug nuts back on and tighten them to the best of your ability by hand. Don’t use the lug wrench yet - you’ll do that once the car has been lowered back onto the ground.
When the lug nuts are tight, lower the vehicle to the ground so that the spare is touching the ground. The full weight of the car shouldn’t be on the tire yet. Now’s the time to break out the lug wrench again, or, if you have one in your kit, a torque wrench. Place whichever tool you have on hand onto the lug nuts and turn clockwise with all of your strength to get them as tight as possible.
When the lugs are fully tight, lower the car the rest of the way onto the ground. When the full weight is down, give the lugs another turn just to be sure that they’re fully tight. If they are you’re safe to replace your hubcap. If you can’t get it back on, just stow it for the time being with the rest of your tire change kit.
How’s the pressure on your spare? If it’s low, your best bet is to head straight to a service station to get it properly filled. And take it slowly! Spare tires aren’t meant to be driven at high speeds.
Let a Pro Handle the Rest
As soon as you can, let a service professional assess your tire situation. CarHub’s certified service technicians will be able to tell you if your damaged tire can be salvaged or should be replaced and they will be able to offer you insights into the health of your remaining tires.
Do you have questions about your tire health? You can book an appointment today at CarHub.ca to speak with a registered service technician about your tires and any other service concerns!